This documentation provides guidance in covering the functionality available within the Migration Manager application. It does so by walking you through the most used for scenarios.
COMPANY SPECIFIC DATA MIGRATIONS
In this guide we will be configuring and carrying out company specific data migrations. We will be copying field values between companies within the same environment.
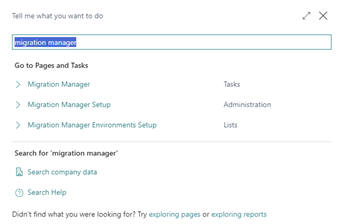
Search for Migration Manager in the search function within the Business Central client. Open the Migration Manager main page.
We need to specify which companies in the environment we will be using in relation to migration data.
Navigate to the “Add Company” action in the action ribbon.
In the wizard select the company you want to manage. The current company used is always highlighted in green. The next step is to select a classification code. Be aware every classification code can only be used once.
Note: You can create your own custom classification codes through the “Migration Manager Setup” page action “Use Classes”.
Repeat the previous step to add all required companies.
Now we will be configuring the table(s), field(s) and record(s) that we want to manage.
Open the “Add one Field” action. Select the company the field value should be used.
Search and select the table and field.
In the “Select Record” page click the select record and select the record that should be used. Click “Finnish” to compete the action.
Note: Other available functions are available in case you require other migrations to be set up.
Add One Field
Select one field in one table for one record.
Add All Fields from One Table
Create migrations for all fields and all records in one table.
Add One Field from All Record
Create migrations for all records based on one table field.
Add All Fields from One Record
Select one record and create migrations for all table fields.
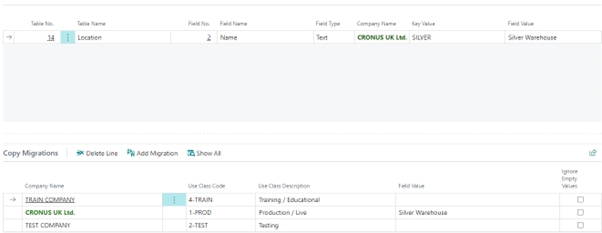
Now we will be configuring the managed migrations for the selected field and record.
In the “Copy Migrations” section displays all migrations configured for the selected table, field, company and record. You can modify the “Field Value” for every migration.
Note: You can also use the copy functions which can be found in the action ribbon. This requires the user to select the company they want to copy the value to.
There are two actions available.
Copy Selected Value
Copies the selected migration record to the “Copy Migrations” section for the selected company.
Copy All Values
Copies the values of all migration records to the “Copy Migrations” section for the selected company.
Once all required migrations are setup we can migrate data between companies.
Click the “Deploy Migrations to Company” function in the action ribbon which will action the migration function. First select the company the migration values should be taken from, and then the destination company the values should be copied to.
This will copy and modify the values in the destination company for all migrations that have been defined in the “Copy Migrations” section.
You are also able to deploy a single migration by using the “Deploy Migration” function.
In the “Copy Migrations” section click on the “Deploy Migration” action.
This will update the table field value for the relevant company with the value of the selected migration.
SETUP ENVIRONMENT SPECIFIC DATA MIGRATIONS
In this guide we will be configuring and carrying out environment specific data migrations. We will be copying field values between environments within the same tenant.
Before we start, we need to set up and register the Migration Manager with Microsoft identity platform by creating and application registration with Business Central.
Search for “Migration Manager Setup” in the search function within the Business Central client. Open the relevant page. Change the “Default Migration Manager Mode” to “Sync”.
Note: This is not mandatory or required. It improves usability.
In the “Migration Manager Setup” click the “Environments Setup”. In the page that opens click “New”.
Note: The Migration Manager requires environment setup for every environment managed by the application.
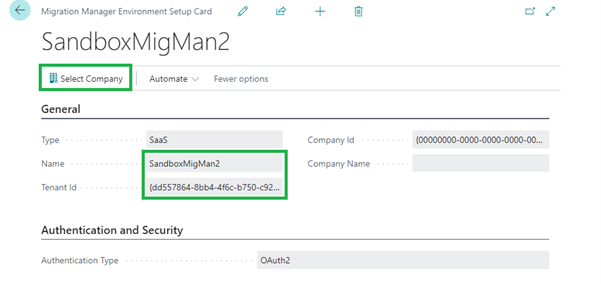
Populate the “Name” field with the name of the environment. This should be the exact name of the environment.
The “Tenant Id” field should be populated with the ID or GUID of your tenant. You can copy this from the browsers URL.
Now click “Select Company” in the action ribbon. This should open the list of companies in the linked environment.
If you want to manage multiple companies from linked environments, you should create separate environment setup entries for every company.
Repeat the previous step to add all required companies in the linked environments.
Search for “Migration Manager” in the search function within the Business Central client. Open the Migration Manager main page.
We need to specify which environment and companies in the environment we will be using in relation to migration data.
Navigate to the “Add Environment” action in the action ribbon.
In the wizard select the environments you want to manage.
Repeat the previous step to add all required environments.
Now we will be configuring the table(s), field(s) and record(s) that we want to manage.
Open the “Add one Field” action. Select the company the field value should be used.
Search and select the table and field.
In the “Select Record” page click the select record and select the record that should be used. Click “Finnish” to compete the action.
Note: Other available functions are available in case you require other migrations to be set up.
Add One Field
Select one field in one table for one record.
Add All Fields from One Table
Create migrations for all fields and all records in one table.
Add One Field from All Records
Create migrations for all records based on one table field.
Add All Fields from One Records
Select one record and create migrations for all table fields.
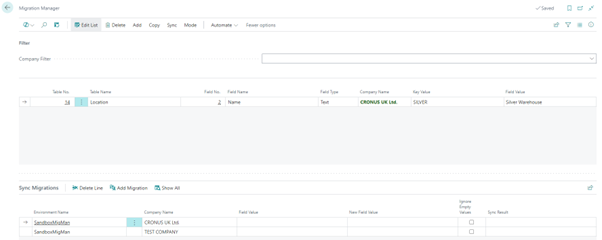
Now we will be configuring the managed migrations for the selected field and record.
In the “Sync Migrations” section displays all migrations configured for the selected table, field, environment and record. You can modify the “New Field Value” for every migration.
Note: You can also use the copy functions which can be found in the action ribbon. This requires the user to select the environment they want to copy the value to.
There are two actions available.
Copy Selected Value
Copies the selected migration record to the “Sync Migrations” section for the selected environment.
Copy All Values
Copies the values of all migration records to the “Sync Migrations” section for the selected environment.
The migrations will need synchronisation with the linked environment to get or update the values.
Action the “Pull Selected Latest Values” action for the selected entry. This will get the values for the migrations configured. By using the “Pull All Latest Values” action you will get all values for all configured migrations.
Once the values are synchronised the “Sync Migrations” section will be updated. The “Field Value” field will be populated with the value of the linked environment. In addition, the “Sync Result” will provide background information covering the result of the synchronisation.
The “New Field” value should contain the new migration values. To push these values to the linked environments, use the “Push Selected New Values” or “Push All New Values” actions.
We have now successfully migrated data between environments within the same tenant.
BACKUP AND DEPLOY STANDARD DATASET
In this guide we will run you through the process of restoring a backup and deploying standard data as configured within the Migration Manager. For instance, you have taken a backup of production and restored it as sandbox. You would like to overwrite production company specific data with values from a test company or from pre-defined values.
First, you should configure and set up the migration manager as described in the previous section.
The first scenario is based around the situation where you have two companies within one environment. For instance, a production company and a test or template company.
Search for “Migration Manager” in the search function within the Business Central client. Open the Migration Manager main page.
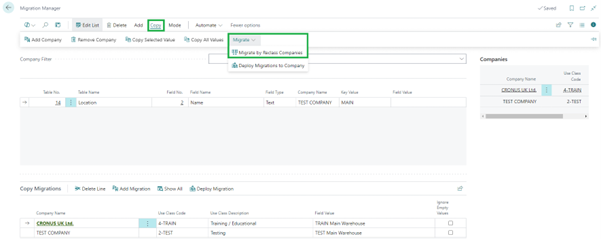
In our scenario we want to overwrite the field values of the configured table and fields in the CRONUS UK LTD company with the values of the TEST COMPANY.
In the action ribbon choose “Copy” and then click the “Migrate by Reclass Companies” function.
In the wizard page select the new use class for the companies managed by the Migration Manager. In our case we should change CRONUS UK LTD to 2-TEST use class. For the TEST COMPANY we use 4-TRAIN.
This will deploy the migration values to the relevant table field for the companies that have been reclassified. It will also update the migration entries for the relevant companies.
Another way of overwriting the table field values after a backup has been restored is by using the “Deploy Migrations to Company” function.
First define the relevant table fields and migrations for the companies that require to be migrated.
Note: That the migrations have been setup for two records in the TEST COMPANY. The values of these records will the overwritten with the defined migration values.
Click the “Deploy Migrations to Company” function in the action ribbon which will action the migration function. In the wizard select the same company in the relevant steps.
This will deploy the migration values to the relevant table field for the company that has been selected.
CREATE MICROSOFT ENTRA APPLICATION REGISTRATION
This section describes how to create a Business Central Entra Application Entry which is required for linked environment migrations.
Login into Business Central and select the environment where you want to use the Migration Manager.
Note: This might require you to carry out the following steps multiple times. One time for every environment.
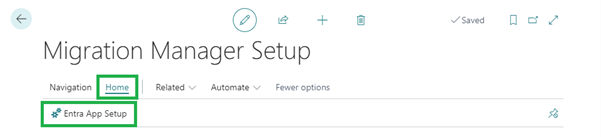
In the Business Central search bar search for “Migration Manager Setup”.
In the page click “Home” and then “Entra App Setup”. This will create the required application entry within Business Central.
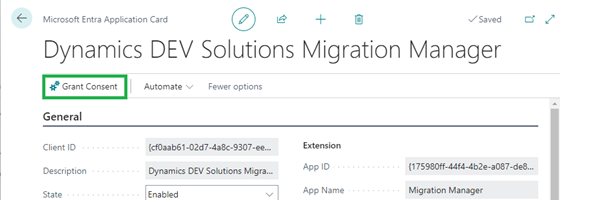
In the “Entra App Setup” page click “Grant Consent”. This might require you to log into your tenant specific O365 account.
Note: You should use an O365 account with the required admin permissions.
You should receive a notification “Consent was given successfully.” This completes the required setup.